Monthly Archives: January 2014

Pineapple Upside Down Cake

Ugandan Pineapples are the best….

[cycloneslider id=”ugandan-pineapples”]

This time when I put my baker’s hat on, pineapple upside down cake – the glistening, sticky sweet top of pineapple slices on top of a simple white cake, came into my vision. This sweet top lifts the simple white cake up a notch.

PUDC 1


In the US, pineapple upside down cakes became popular in the 1920s when canned pineapples were easily available for reasonable prices while fresh ones were difficult to find  and if they were available, they were very expensive. The widespread availability of canned pineapples owes to Jim Dole of Hawaiian Pineapple Company who canned a major chunk of pineapples available. Traditionally pineapple upside down cakes were made in cast iron skillets on top of the stove.


PUDC 2


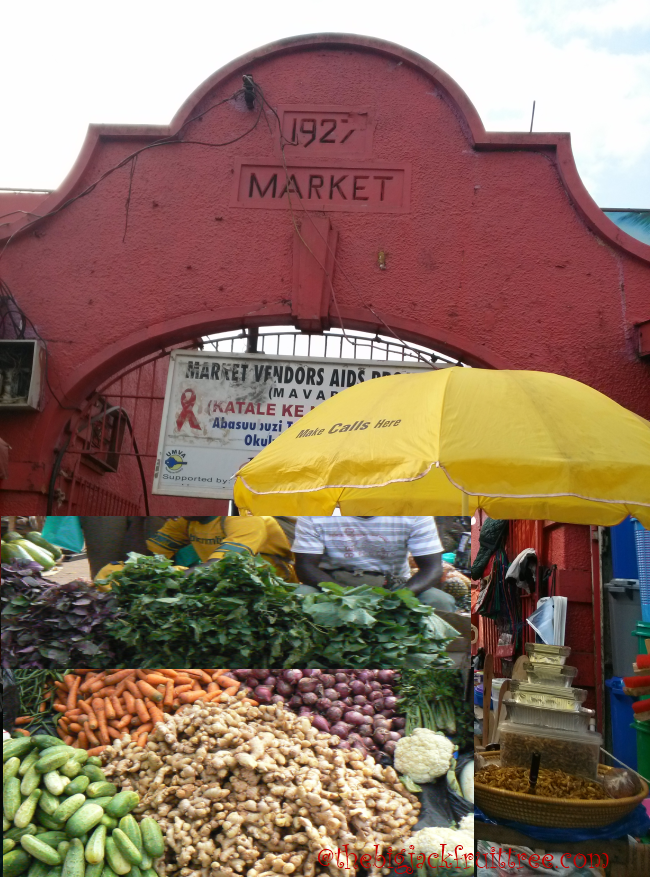
When you bake a pineapple upside down cake in Kampala, it’s criminal to use canned pineapple since pineapples grow in plenty in Uganda and are currently in season. Not only the quantity but the quality  is also topnotch. The pineapples are sweet, succulent and big. The skin/crust of Ugandan pineapples are hard and hence has a longer shelf life. Read what Ms. Salima Njeri, a Kenyan trader says about Ugandan pineapples. 


PUDC 3


As I was little apprehensive about using  fresh slices of pineapple instead of canned as it can make the batter watery. So I tried my hand at canning the pineapple slices which I did the day before baking.Peace, my house help helped me in peeling and slicing the pineapple. If you are not skilled at peeling whole pineapple, I suggest cutting it into rings after cutting the crown and stem off. And then cut the skin off holding each slice . The core can then be removed using a cookie cutter or any sharp cylinder of right size.

Sugar syrup is made using sugar and water in a ratio of 1:2 as these pineapples are really sweet and will be used up in a day. If the slices have to be kept for long use a syrup of 1:1 ratio.


PUDC 4


For any upside down cake the fruit and brownsugar are placed on the bottom of the pan before batter is poured in. But here caramelised sugar is used instead of brown sugar. Oil and yoghurt are used instead of butter in my cake recipe.


PUDC 5


In pineapple upside down cakes a glazed cherry each is placed in the middle of each slice where the core of the pineapple was. Since there were no cherries in stock in my pantry I’ve decided to bake mine without it as cherries wouldn’t add on in any way to the taste of the cake. But later once the cake was turned upside down,I realised that it was not very appealing to look at.


PUDC 6


Voila! here’s the final product. Red Plum jam came to my rescue.

Min

divider-recipe

Ingredients

For Canning ( read Cooking J ) the fresh pineapple slices

Sugar – 1 cup

Water – 2

Orange peel – 1-2 pieces (optional)

For the base

Granulated sugar – ¼ cup

Water -1 tablespoon

Pineapple rings – 6

For the cake

All purpose flour – 2 cups

Baking powder – 1 ¼ teaspoons

Baking soda – ½ teaspoon

Granulated sugar – 1 ¼ cup ( can change it according to the sweetness    – of the sugar available)

Vegetable oil – 2/3 cup

Yoghurt  – 1 ¼ cup

Eggs (large) – 2

Vanilla essence – 1 teaspoon

Syrup from the cooked pineapple – ¼ cup

Cooked pineapple (minced) – ½ cup

Method

  • Skin the pineapple, cut into 1 cm thick slices and remove the centre core.
  • Heat sugar and water ( add orange skin as well if it’s used ) together till it starts simmering.
  • Transfer the prepared slices into the syrup and keep it in a waterbath and cook for 45 minutes with a lid on.
  • Remove from the waterbath and cool. Cooking of the pineapples can be done in advance.
  • Prepare a 10 inch / 25 cm tin by buttering the base and the sides. But flour only the sides.
  • Heat the sugar for the base till it caramelises.
  • Add 1 tablespoon warm water and heat it again to get pourable consistency without any solid bits.
  • Pour into the prepared tin and spread it on the base of the tin by tilting it.
  • Arrange the pineapple slices in a circular manner with one in the middle.
  • Sift the flour, baking powder and baking soda together twice.
  • Beat sugar, oil and yoghurt together till till creamy and mixed well.
  • Add eggs one at a time and beat well.
  • Now add one third sifted flour, mix well.
  • Add half of the syrup, followed by half of the remaining flour. Beat till the flour is just mixed.
  • Add the remaining syrup and flour and mix again.
  • Once all the flour is incorporated mix the batter well for 4 minutes using a wooden spoon. If an electric hand mixer is used, attach the whipping attachment and beat for 3 minutes in medium speed.
  • Transfer the batter to the prepared tin and bake for 35 minutes or until a wooden skewer inserted in the centre comes out clean.

 recipe-divider

20 Jan 2014

A brownie in any shape…

For the most part of December, I was in Toronto. And for the most part of December, it was snowing in Toronto. And as long as one looked at it from within the warm interior of the home, the snowscape was so beautiful!
Being housebound has its plus points too… one can take up any of those projects filed away for ‘one of these days’… or one could bake! On a cold day what could be better than the fragrance of sugar and chocolate and warm caramel wafting through the house? So that is what I did… baked brownies!
And brownie goodness is something that one needs to spread around. Distributing brownies to friends is not only good karma, but good calorie control strategy too! 🙂 And one of the friends who tasted the brownies wanted the recipe. No recipe can be complete without some pictures. So just to get some pictures, I decided to bake some today. Beginning of a long relaxed weekend, what better time to mess around in the kitchen!
So I’m melting the butter with the chocolate, stirring it round and round… when the idea hit me. Why do brownies always have to be made in a square or rectangle pan? Why not try something different? After all, I claim ‘continuous improvement’ as my middle name. (Some of my people call that ‘won’t leave well enough alone’ too, but what do they know!)
In a jiffy, thought turned into action and the brownies were reborn as brownies cup cakes! But even though I say so myself, they were pretty good… pretty darn good indeed. 🙂

brownie-cakes2

divider-recipe

Ingredients

2 sticks unsalted butter, plus more for pan

8 ounces bittersweet chocolate chips

1 1/4 cups all-purpose flour

1 teaspoon baking powder

Pinch salt

4 large eggs

1 1/2 cups sugar

2 tablespoons instant coffee

2 tablespoons dark rum (optional)

1 1/2 cups walnuts

brownie-ingredients

Directions

Preheat oven to 350 degrees F.

Mix butter and chocolate in a double boiler or in a pan over simmering water. When fully dissolved and smooth and shiny, remove from the heat and allow to cool.

choco-butter

Sift together flour, baking powder, and salt.

Dissolve the coffee in two tablespoons of warm water. Beat the eggs with sugar, dissolved coffee ,and rum, if using.

egg-sugar

Add the cooled chocolate mixture and mix well. Add the flour in batches and incorporate into the mix. Add the walnuts.

Spoon into the cupcake pan and bake for 18 to 20 minutes. The brownie cakes are done when a skewer inserted into the center of it comes out clean.

 brownie-cakes

Cool in the pan for five minutes before grabbing the brownie cakes.

~Ria

divider-recipe-end

17 Jan 2014

NYBG Train Show

train-show-small

I was so afraid I was going to miss the NYBG holiday train show this year. For starters, I was travelling for almost the whole of December. And, once I got back, the polar vortex also arrived, bringing ice and snow and sleet with it… Still, despite all odds, I made it in the nick of time… went and saw it on the last day of the show! 🙂

As my people already know, I am a great fan of trains. Small trains, big trains, unusual trains… all of them. Even the PATH trains. But at the NYBG show, I found the trains sort of meh… What really got me was the landscaping.

Combining historical and geographical interest, the show features 140 iconic New York buildings, many of them from dates past. The models are made to scale using all natural plant parts. It is almost like a miniature tour of the city!

This year’s show features 21 model trains and covers 6,000 square feet of area with 1,200 feet of track laid out. The trains in the show are G-gauge and represent American trains from the late 1800 steam engines to today’s high speed passenger trains.

A new introduction this year are trains made of plant parts, looking like they are straight out of some fairy tale. Hoping there will be many more of them next year!

train-show1

Among the buildings recreated are the Brooklyn Bridge, the New York Public Library, the Guggenheim, City Hall, St. Patrick’s Cathedral, Radio City Music Hall, Rockefeller Center, the original Pennsylvania Station, Met Museum and many many more.

The train show debuted at the NYBG in 1992. The designer behind the wonderful miniature landscapes is Paul Busse, assisted by a team of 20+ artists and engineers of the Applied Imagination team. More examples of their fascinating work can be seen at www.appliedimagination.biz.

train-show2

Plans for the buildings are made with the help of photographs and architectural drawings. Then a shell is made with foam board. Twigs, bark, moss, leaves, flowers, acorns, pine cones, seed pods… anything that comes from nature is used to mimic the architecture. The finished product is coated with a thin layer of resin to protect it from dust and moisture.

train-show3

Each structure involves hundreds of hours of painstaking work, with every intricate detail recreated through the imaginative use of materials. The minute details, executed so meticulously, truly gives meaning to that oft repeated word ‘awesome’!

details

I was left with the definite impression that the original structure would have been way better if it was constructed with natural plant parts! 🙂

Notice the pistachio shells and corn husk?

Notice the pistachio shells and corn husk?

The holiday train show is held at the Enid A. Haupt Conservatory of the New York Botanical Garden.

~Ria

Divider2-LR-4px

From the ‘Am I seeing things?’ department

Was Sunnyside, Washington Irving’s home in Tarrytown, featured twice in the show? I believe so (in fact, I have documentary evidence!) but realised that only when I was looking through the pictures taken! 🙂

Divider2-LR-4px


15 Jan 2014

My Pawpaw Man

Pawpawman1

Fruits and Vegetables here in Kampala, Uganda, really excite me. They are so fresh and good and come straight from the farms. I do prefer to shop at the vegetable market in Nakassero mainly frequented by expats. However, it is a bit of a pain going to Nakassero market unless one is chauffeured around as getting hold of a parking space in that area is as difficult as getting hold of an ostrich egg.

Pawpawman2

On my visits to Nakassero market I always came across a man who sits on the floor by the corner of a shop with a small heap of pawpaws/ papayas in front of him, calling out to customers. To his disappointment my response was always negative as the smell of papaya was one of the few things I couldn’t stand. Every time I go to the market he’ll be there trying to sell pawpaws to me. Then finally one day I was so amazed to see how determined and good he was in his marketing skills, I budged. Marketing managers take note, there are a few lessons you can learn from him.

He was so happy to sell a huge pawpaw to me that he gave me another one as a ‘bonus’. 🙂 (Bonus in Ugandan parlance is a giveaway, a free gift!)

Pawpawman3

Once I got home I tried a few pieces of the pawpaw on the insistence of my house help, Rose. Though I can’t say I became an ardent fan of the pawpaw, I don’t mind some but not to the extent of using a papaya face pack. I’m happy that I’m a convert when you consider the health benefits of Papaya. Thank you, my Pawpaw Man… “Weebale Ssebo!”

~Min

13 Jan 2014

It’s cold out there…

It is cold… believe me, it is really really cold… Brrrr… it is brrrrold. No, that is not true. Brrrrold is bracing cold. When you want to go for long walks with a sweater thrown over the shoulders and something from Starbucks in your hand. Cold that makes you think of good things like fireplaces and warm red wines and chocolate brownies.

What we just went through is nothing like that. This was frrrold… freezing cold, bone chilling cold, mind killing cold. Cold that breeds inertia, cold that makes you think of the equator and escape.

The polar vortex, as the cold snap was called by the meteorologists, has set many records, including the coldest Jan 7th since 1896!

Apparently, it has also inspired many to conduct interesting experiments. We all know about the ‘lick the lamppost’ experiment… who doesn’t love A Christmas Story? Happens, a girl in New Hampshire really did that and was stuck to the pole for 15 minutes before she could be freed. She apparently hasn’t seen the movie, or couldn’t resist the ‘triple dog dare’!

Some other interesting experiments include throwing boiling water up into -17 degree F air, blowing bubbles that freeze in mid-air, and making slurpees by super cooling soda. If you would like to see these in action, take a look here.

Anyhow, when weather gets this cold, I know it is time to pack my bags and bid adieu to New York for a few weeks. Fortunately, the salt mines where I work has offices all over the world – literally. So by the end of the month, I’ll be happily headed to Bangalore, part work and part vacation. And won’t be back till the buds start waking up and daylight savings time is on again. 🙂

Thinking of travel, I knew I needed a new toiletries bag. And I had to make it before my trip. So finally got around to it this week. Yep, being house bound has its advantages too; things get done!

Actually, there is not much to it. Take a rectangle and circle of fabric, make partitions in the rectangular piece, attach it to the circular piece, and you are done! 🙂

Any kind of sturdy strong material will work for this. The measurements will depend upon how big you want it. Mine is nine inches tall with a six inch diameter. For that the measurements were 23×17 inches for the rectangle and 7 inch diameter for the circle.

toiletries-bag-1

Make a narrow fold and stitch 4 inches on two of the short sides of the rectangular piece.

Fold and stitch both the long sides of the rectangular piece, one inch on one side (the side where the side stitches are already made) and half an inch on the other.

toiletries-bag-3

Fold and pin four inches along the long side where the half inch stitch was made. And mark sections as you see need.

toiletries-bag-4

These are to hold the brushes, perfumes, lotions, etc. Stitch along the marked lines.

toiletries-bag-5

Now, attach the rectangular piece (folded edge) to the edge of the circle. Turn inside out and thread a ribbon through the top fold.

toiletries-bag-6

Tada… all done!

toiletries-bag-7

If you would like more detailed instructions, feel free to email me: ria at thebigjackfruittree dot com.

~Ria

 Divider2-LR-4px
Randomly…
I have the serenity to accept the things I cannot change (what else is beer for), the power to change the things I can (coffee to the rescue) and the wisdom to know the difference (workin’ on that one).

Divider2-LR-4px


10 Jan 2014